11 KiB
Certificate Center Management Utility (CeCeMaUt)
A set of utilities and a graphical interface written in Ruby using Sinatra.
This software suite is primarily designed to simplify working with a certification center and the OpenSSL utility, which offers extensive functionality.
CeCeMaUt provides:
- Structure management for the certification center (root certificate, intermediate and subordinate certificates).
- A collection of Bash utilities for creating the structure and issuing new certificates.
- A GUI for managing and issuing certificates via a browser.
- An API for controlling the certification center through command‑line utilities.
- A simplified authentication system for role‑based access to certificate management.
Installation
Using only scripts
In this scenario, you do not need to install Ruby or other packages, only OpenSSL and Bash are required. The scripts are the sole management interface.
git clone https://github.com/bayrepo/cecemaut.git
cd cecemait
cd utils
Create a file named custom_config.sh with the following contents:
ROOT_DIR="[full path to the future certificate store, preferably an empty directory]"
COUNTRY_NAME="[two‑letter country code]"
ORG_NAME="[organization name]"
COMM_NAME="[additional organization name]"
SERT_PASS="[password for the root and intermediate certificates]"
VAL_DAYS="[number of days the root certificate is valid]"
Then run bash prepare.sh. If successful, the directory structure will be prepared and the necessary certificates will be created. Further operations are performed by separate scripts in the utils folder, described in the documentation.
Installing the web service
Manually for RPM‑based systems (example AlmaLinux 9)
To run the service, Ruby 3.3 is required. It can be installed with RVM as described in the Dockerfile or via an alternative Ruby package. If the system Ruby already provides version 3.3 (e.g., Fedora 41), this step can be skipped.
Installing the alternative Ruby 3.3 package on AlmaLinux 9
# Add the repository that contains the alternative Ruby
echo -e "[brepo_projects]
name=brepo_projects
skip_if_unavailable=True
baseurl=https://repo.brepo.ru/hestia/
enabled=1
gpgkey=https://repo.brepo.ru/hestia/brepo_projects-gpg-key
gpgcheck=1" > /etc/yum.repos.d/brepo_projects.repo
Note: This works only for AlmaLinux 9 / RockyLinux 9 / CentOS 9. For other distributions, it is preferable to use RVM or other Ruby switching mechanisms.
# Install the package
sudo yum install alt-brepo-ruby33 alt-brepo-ruby33-devel
# Enable the CRB repository
sudo dnf config-manager --set-enabled crb
# Install required build dependencies
sudo yum install -y curl git gnupg2 gcc gcc-c++ patch readline-devel zlib-devel libyaml-devel libffi-devel openssl-devel ruby ruby-devel
# Clone the repository
git clone https://github.com/bayrepo/cecemaut.git
cd cecemait
# Create application keys
bash utils/make_app_keys.sh .
# Install necessary gems locally
/opt/brepo/ruby33/bin/bundle install
# Create the database
/opt/brepo/ruby33/bin/bundle exec sequel -m migration sqlite://db/base.sqlite
Configuration files are located in classes/config.rb. If you need to override settings such as the IP address to bind to, the number of entries per page, etc., create classes/config_custom.rb and override the constants:
PER_PAGE = 30 # number of entries per page
LIFE_TOKEN = 300 # token lifetime in seconds
ALLOWED_IPS = [
  # Example: '192.168.1.10',
  # Add allowed IP addresses here
  '*'
] # list of IPs from which the web interface can be accessed, or '*' for unrestricted access
PORT = 4567 # port to bind the application
IPBIND = '0.0.0.0' # IP address to bind the application
Example config_custom.rb that changes the binding to 127.0.0.1:
IPBIND = '127.0.0.1'
Run the application:
/opt/brepo/ruby33/bin/bundle exec /opt/brepo/ruby33/bin/ruby app.rb
Don’t forget to open the firewall port to allow access to the application.
Building a Docker image
To build and run a Docker image, perform the following:
# Install Docker
# Clone the repository
git clone https://github.com/bayrepo/cecemaut.git
cd cecemait
Configuration files are in classes/config.rb. If you need to override settings, create classes/config_custom.rb as shown above. It is not recommended to change IPBIND or PORT when building a container, as that would also require editing the Dockerfile.
PER_PAGE = 30
LIFE_TOKEN = 300
ALLOWED_IPS = ['*']
PORT = 4567
IPBIND = '0.0.0.0'
Build the Docker image (this may take some time as Ruby is compiled):
docker build -t certcenter:latest .
Prepare directories for logs and certificates, for example:
mkdir -p /opt/ca /opt/logs
Run the container:
docker run -d --name certcenter -p 9090:4567 -v /opt/ca:/opt/cert/certcenter/ca -v /opt/logs:/opt/cert/certcenter/logs certcenter:latest
Working with the web service
First run
When you first access the application (e.g., via http://127.0.0.1), it will prompt you to enter details about the certification center. This information is stored only once and cannot be changed later unless you edit it manually or use the OpenSSL utility. You can also clear the certificate directory and delete utils/custom_config.sh. The page looks like this:
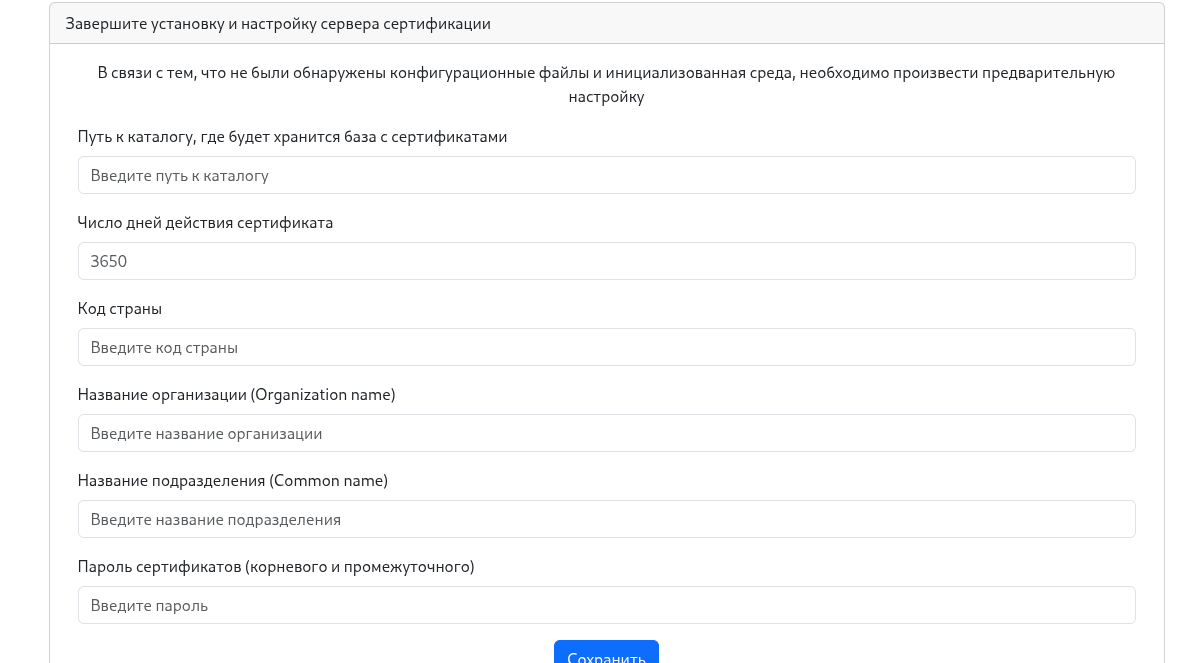
Fill in the form; the values will be saved in utils/custom_config.sh:
ROOT_DIR="[full path to the future certificate store, preferably an empty directory]"
COUNTRY_NAME="[two‑letter country code]"
ORG_NAME="[organization name]"
COMM_NAME="[additional organization name]"
SERT_PASS="[password for the root and intermediate certificates]"
VAL_DAYS="[number of days the root certificate is valid]"
If you install the application in a Docker container, the certificate directory should be /opt/cert/certcenter/ca. If you run it outside a container, use a full, accessible path such as /home/test1/ca. A typical root certificate lifetime is 10 years (≈ 3650 days). Set the country code to “RU”, the organization to “TestORG”, the unit to “TestORGCert”, and the signing password. (Storing the password in a file isn’t ideal, but it’s acceptable for now.)
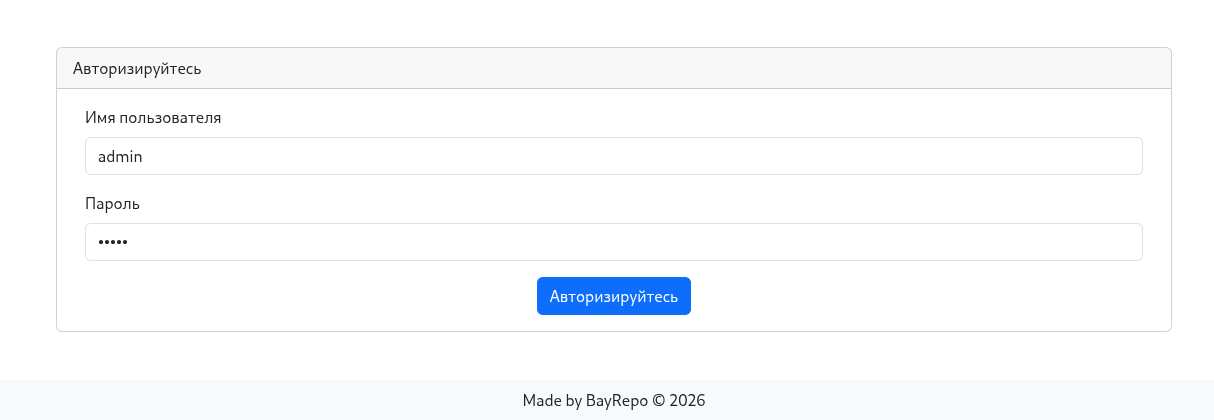
After filling the form, click Save. The directory structure and configuration files will be created. You can then navigate to the root page /. A login prompt will appear. The default user is admin with password admin; you should change it immediately or create a new user with a different name and admin rights.
Login page screenshot:
After a successful login, you will be redirected to the certificates page intended for server installation.
User privileges
Users are divided into three categories:
- user – can view all certificates but cannot create or revoke them, nor can they see or manage other users.
- creator – can view all certificates, create and revoke them, but still cannot manage other users.
- admin – has full access.
The interface adapts based on the privilege level, showing or hiding menu items and forms accordingly.
The following sections are written for admin users; other privilege levels will see similar functionality with restrictions.
Server certificate list
This page lists server‑side certificates, allowing you to view the status of each (revoked, valid, or outdated).
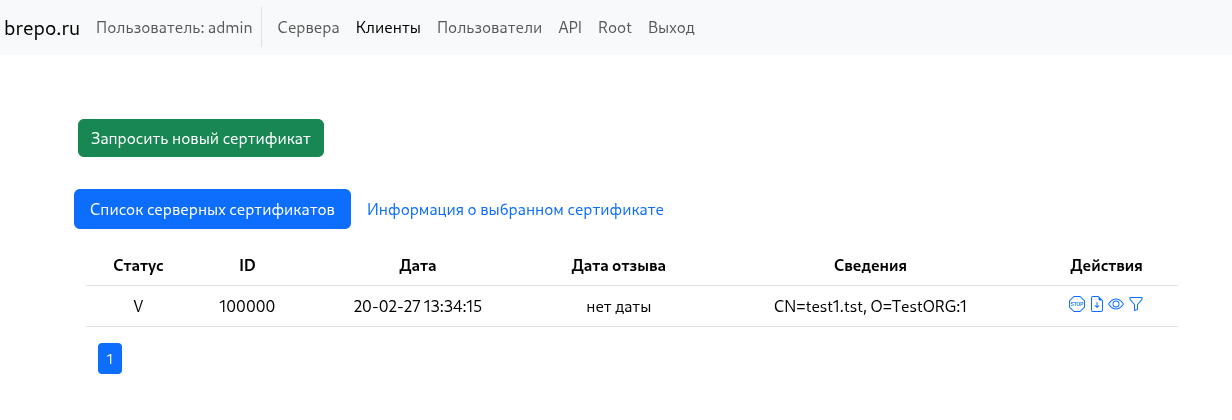
Below are the actions available for a certificate:

From left to right:
- Revoke the certificate
- Download the certificate
- View certificate details
- Filter client certificates for the selected server certificate
When you download a server certificate, a ZIP archive containing several files is provided:
Generated key set for server installation:

- private key: `test1.tst.key.pem`;
- server certificate: `test1.tst.cert.pem.1`;
- CA chain: `ca-chain.cert.pem`;
- list of revoked certificates: `ca-full.crl.pem`.
These certificates can be deployed, for example, on an Nginx or Apache host. The set is complete and sufficient for certificate validation.
You can create a new certificate by clicking Request new certificate:
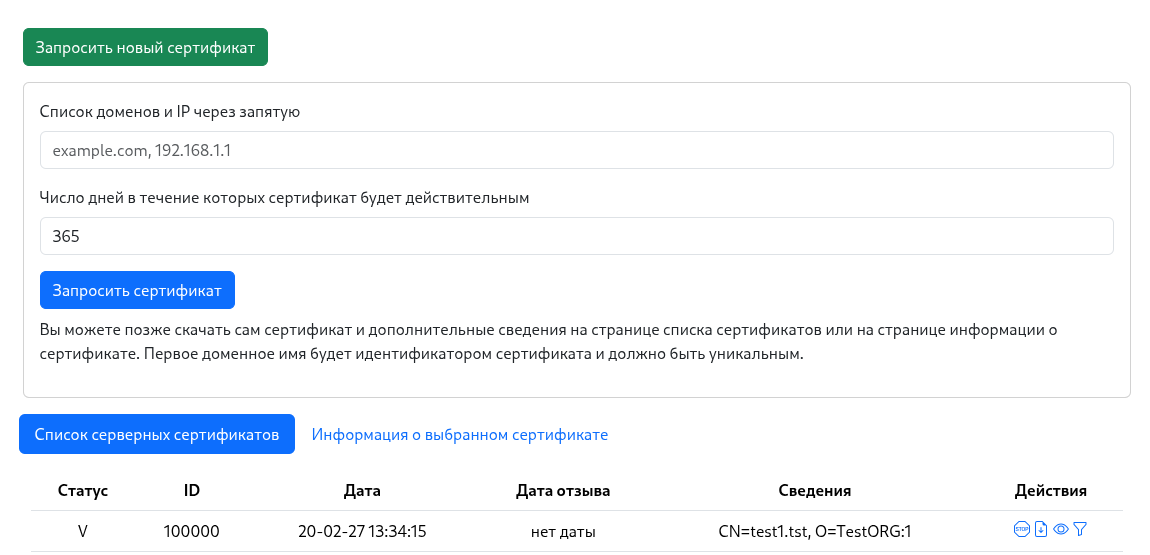
Enter the server domain (the first domain will be used as the server identifier) or multiple domains and IPs, and specify the certificate validity period.
If no certificate is selected, the Certificate information tab remains inactive. Click the eye icon next to a certificate to activate the tab and view its details.
The certificate information page shows:
- OpenSSL output for the certificate
- Revocation status (revoked or not)
- Download link
- A list of all files belonging to the certificate, with their locations in the certificate store – useful when aligning the store with web‑server configuration.
Client certificates
You can issue many client certificates for a specific server certificate. These are used to authenticate clients to the protected server.
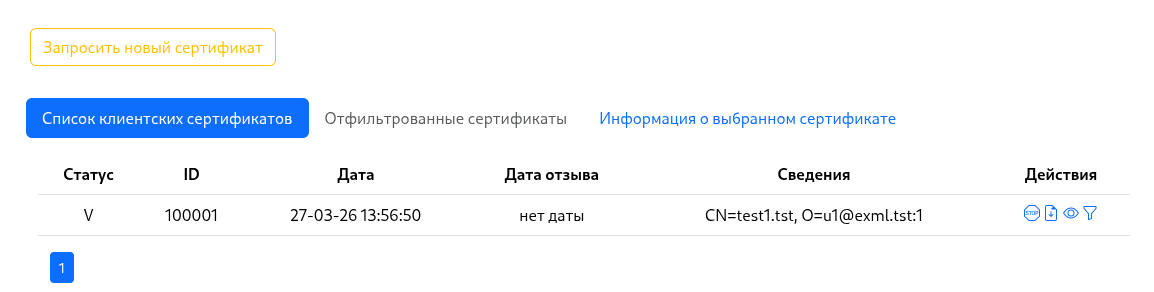
Actions for client certificates mirror those for server certificates.
The client‑certificate request form differs:
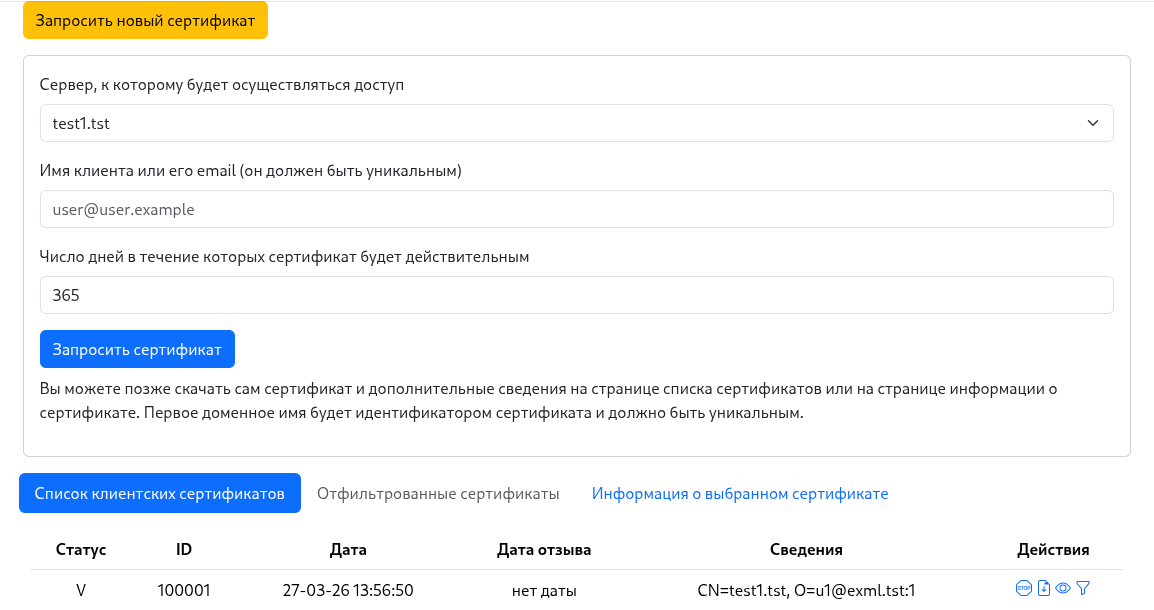
The new parameters are the server for which the client certificate is issued and an identifier for the client (e.g., the client’s email or another unique string).
The downloaded files for a client certificate look like this:
Generated key set for client installation:

- private key: `u1@exml.tst_private.key.pem`;
- client certificate: `u1@exml.tst.cert.pem.1`;
- CA chain: `ca-chain.cert.pem`.
Users
This page lists users, allows you to delete or edit them, and create new users.
Create a user with the Create user button and fill out the form.
User actions are performed with the buttons next to each user:
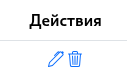
From left to right:
- Edit user
- Delete user
API
The application exposes an API for programmatic control.
API documentation is available here.
A helper script utils/api_call.sh is also provided. It handles authentication and executes commands with the obtained token. The available commands are:
Usage: api_call.sh -s SERVER -u USER -p PASS <command> [args]

Commands:
  install <login> <password> <email>                 # Create initial admin user (no auth needed)
  listserv                                           # List server certificates
  listclient                                         # List client certificates
  addserv <domains> <validity_days>                  # Add server certificate
  addclient <server_domain> <client> <validity_days> # Add client certificate
  listuser                                           # List users
  adduser <login> <password> <email> <role>          # Add user (role numeric)
  revokecert <id>                                    # Revoke certificate
  deleteuser <id>                                    # Delete user
  edituser <id> <login> <password> <role>            # Edit user
  certdetail <id>                                    # Cert detail
  rootdetail                                         # Root cert detail
  help                                               # Show this help

Options:
  -s SERVER   Base URL of the API (default: http://127.0.0.1:4567)
  -u USER     Username for authentication
  -p PASS     Password for authentication